
Cloud services have transformed the way people have stored their data. Cloud technology offers various benefits over traditional physical storage mediums such as hard disk, external hard disk, DVDs, USB sticks. Cloud storage keeps your data secure even in the case of natural disasters. You can collaborate with others in real time and take advantage of large file-sharing features.
If you’re using Windows 10 or Windows 11, the Microsoft OneDrive application is pre-installed. In some editions of Windows, your documents, pictures and videos are forcibly synced online with OneDrive. If you don’t like OneDrive, or if you’re running out of OneDrive storage, you’ve come to the right place. Today we will discuss how you can unlink OneDrive and whether unlinking will impact your data or not. We’ll also discuss some techniques to free-up your OneDrive storage to make room for new files without upgrading. Let’s begin.
Does Unlinking OneDrive Delete My Files?
No, unlinking OneDrive does NOT delete any of your files. Your files continue to remain on the OneDrive server and you can access them again by signing in to your OneDrive account. There is no reason to worry about data loss.
How to Unlink OneDrive?
- Click on the OneDrive icon in the notification area of the taskbar.
- Click on the Help & Settings icon.
- Select Settings from the menu.
- In the new dialog, click on the Account tab.
- Click on Unlink this PC.
- In the confirmation prompt, click on the Unlink account.
Are You Running Out Of OneDrive Storage?
If yes, we’ve got some good news. You can free up your OneDrive storage without deleting your valuable files.
Causes & Impacts of Low Storage Issue
The low storage could be attributed to many reasons:
- Duplicate files are one of the major reasons behind low storage issues. When multiple devices are linked to a single OneDrive, there is a possibility of accumulating duplicate files from one of those devices during the file sync process. These duplicates will be then synced to other devices as well.
- Our bad file-organizing habits are also to be blamed.
Low storage can adversely affect your work in various ways. Here are some instances:
- When you run out of OneDrive storage, the syncing of your files will also get impacted. Your files will be synced slower. Updating changes won’t happen in real time. When you’re working on such partly synced files, it can further escalate the problem and cause confusion.
- You may not be able to store new files, or even worse, you will be forced to delete some files in your account to free up storage. This can cost data loss if not done properly.
- If you’re using backup services to regularly back up your data to the cloud, they may not function correctly. New data will not be stored on the cloud, and your files may not be protected against viruses, theft, or corruption.
Method 1: Find & Delete Duplicates
- Visit the Cloud Duplicate Finder website.
- Create a new account. The account creation process is free. You’ll need to verify the email address by clicking on the verification link received.
- Click on the OneDrive icon.
- Click on Add New Drive.
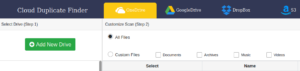
The Cloud Duplicate Finder scan interface
- Sign in to your account in the OneDrive website’s login form.
- Provide CDF the permissions to access your OneDrive files by clicking on Yes.
- Now, a list of all folders in your OneDrive account will appear on the left. Select the top-most folder(s) to scan them for duplication.
- Click on Scan.
- Wait for the scan to be over. Once the results are compiled, you will be able to mark/ unmark your files for futher processing. Mark the files you want to remove, and unmark the ones you want to keep. You may automate this process using the various options provided in the Select Duplicates button.
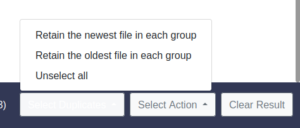
- Finally, click on Select Action, and choose whether to delete your files or move them to a temporary folder.
Benefits:
- Supports finding duplicates on popular cloud platforms including OneDrive, Google Drive, Dropbox, Amazon S3, Box Cloud, etc.
- Fully Web-based app. No files need to be downloaded or synced.
- Creates a temporary token using the official APIs provided by your cloud service provider. After completing the duplicates removal, you may revoke permissions to the Cloud Duplicate Finder app anytime. CDF does NOT ask for or store your confidential information such as passwords.
- Find visually-similar duplicate photos using the Similar Photo Finder feature. Similar Photo Finder currently supports only OneDrive and Google Drive. You can change the scan level from low to hard, depending on your requirements.
Method 2: Find & Delete Large Files
- Sign in to your OneDrive account.
- Click on the storage quota information displayed on the bottom left (XX GB used of XXGB).
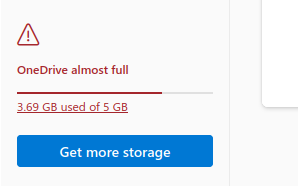
- In the new page, click on What’s taking up space?
- You’ll get a complete list of all large files eating up your storage.
Other Alternatives to Unlinking OneDrive
Instead of unlinking your OneDrive, you may also disable it or completely uninstall it, if you don’t use it.
- Disable OneDrive
If you don’t use OneDrive, you may disable it completely. When disabled, OneDrive will not run in the background or actively consume your computer resources.
- Open Group Policy Editor. To do so, press Windows Key + R. Type in gpedit.msc in the box and then click on OK.
- Local Group Policy Editor will now open.
- Navigate to Computer Configuration > Administrative Templates > Windows Components > OneDrive.
- Double-click on Prevent the usage of OneDrive for file storage in the right-hand side panel, and change its status to Enabled.
- Click on OK.
Note: Group Policy Editor is only available in the Pro edition of Windows 11 and Windows 10. If you’re using a Home edition, you may not be able to use it without downloading third-party scripts.
- Uninstall OneDrive
You may remove the OneDrive application from your computer. Again, you won’t lose your personal data. It can still be accessible when you install OneDrive or access it using the OneDrive website.
- Click on Start > Settings.
- Click on Apps > Apps & Features.
- Select Microsoft OneDrive, and then click on the Uninstall button.
- Follow the removal wizard.

Raza Ali Kazmi works as an editor and technology content writer at Sorcim Technologies (Pvt) Ltd. He loves to pen down articles on a wide array of technology related topics and has also been diligently testing software solutions on Windows & Mac platforms.