
Manage Google Backup & Sync Files and Delete Duplicates
Google Backup & Sync is the new name of the Google Drive app for Windows and Mac. It has become a major backup solution for backing-up volumes of data while preserving the original directory structure. Importantly, it requires little to no effort on the part of the user.
Google Drive gets populated very soon, because of the ease provided by Backup & Sync for both Windows & Mac platforms. Before you opt for spending some bucks to subscribe for a plan with more storage, check if any duplciates are occupying space on your Google Drive. And there is no better way to do that than using Cloud Duplicate Finder. It is 100% online, secure, super-fast and very easy-to-use.
Delete Google Drive Duplicates with Cloud Duplicate Finder
See Terms of Service | FAQs
The simple and straightforward look, coupled with handy customizable options let you take full advantage of the 15 GB of free storage. It ensures that your data is always synced across all of your devices and the cloud account.
Manage Google Backup & Sync Files
Google Backup & Sync gives you absolute freedom to sync data in multiple ways. You’re free to choose any folder(s) located on the hard disk, SSD, and even removable storage drives like external HDD and USB sticks. Follow the steps given below to install the program on your computer.
Download & Install Google Backup & Sync
Visit the Google Backup & Sync webpage to download the latest version.
Double-click the downloaded setup, and install the program on your PC.
Log-in to Your Account
Launch the app and click GET STARTED.
The app requires a Google account which can be setup for free. Enter your login credentials to sign in, or click the Create account link if you don’t have a Google account.
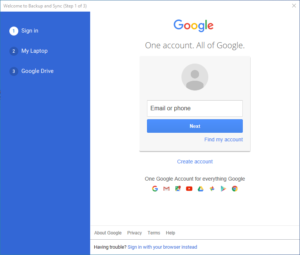
Enter your login details and click Sign in. There is one more step to complete before you can begin the data sync.
If you have activated 2-step verification on your account, you will receive a verification code via sms on your registered mobile phone. You can also use a backup code (if you’ve saved them), or tap Yes on a tablet or phone that is connected to the Internet.
Customize Folders to Backup
After logging in, you will be prompted to select the folders to automatically backup. As a default, Desktop, Documents and Pictures directories are selected. You may un-select the default locations if you wish, and add any new folders by clicking the CHOOSE FOLDER link underneath.
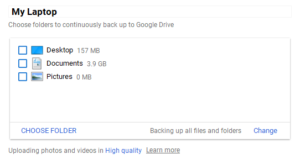
Selecting the folders to be synced
Choose Upload Quality and Size
The next area requiring your attention is selecting the photo & video quality and size settings. This is important primarily because Google offers you unlimited storage space for free to store high-quality image and video files (at reduced size). In other words, you allow Google the permission to compress your images and videos (without compromising on their quality) to save cloud storage space.
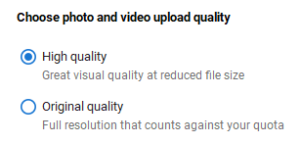
Choose photo and video quality
And of course, you have an option to store your photos and videos in their original formats, original quality and size. However, opting for this method means photos and videos will count against your cloud storage quota, and you’ll be able to enjoy only a limited 15 GB of free storage space.
If you select Original quality, you’ll need to purchase a premium plan once your storage quota exceeds. The subscription should cost you a minimum of $1.99 per month for 100 GB of storage. The annual plans offer a handsome discount. Businesses and individuals can also opt for higher plans if needed.
Throttle Bandwidth Speed (Optional)
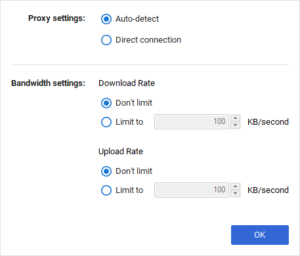
Google Backup & Sync allows you to set an upper limit for the download and upload speed. These settings are helpful if you’re a multi-tasker and are downloading too many large files, or if you don’t want the sync process to drain any bandwidth you require for other usage. Click on the Network settings link and specify the limits in KB under the Bandwidth settings section. Click OK to confirm.
Choose What to Sync
Google Backup & Sync gives you an option to synchronize your entire My Drive, or a specific part of it. Syncing ensures that you’ve got access to your documents, music, images, videos and other files even if you’re not connected to the Internet. You can access your files straight from the File Explorer (earlier known as Windows Explorer).
- Sync everything in My Drive: As the name suggests, this synchronizes all the contents of your My Drive to your computer. Going for this option might cost you a hefty amount of storage.
- Sync only these folders: If you’re running short of local disk space, consider this option. Syncing only a few folders can save your disk space, and at the same time, ensure that you’re up-to-date with the latest file versions on all connected devices (such as a computer, Mac, tablet and smartphone). Since a limited data is downloaded/ updated, it is a bandwidth-saving and less resource-hogging option.
Click on START to proceed. You can now monitor the sync progress by clicking the Google Backup & Sync app icon in the Notification Area of the taskbar.
Global Delete vs Delete Only from this Device
Another setting worth considering is to determine whether you need to delete files from all devices when you delete them from your PC.
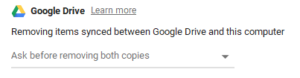
- Always remove both copies: This global delete option allows you to save space by eliminating unwanted files from all devices, rather than a single device at a time. This, undoubtedly, comes with an added risk of accidentally losing any important file.
- Never remove both copies: This option keeps another version of your data on other devices intact even if you delete the file from the current device. However, this also means it would require more time and effort to organize and manage your files.
- Ask before removing both copies: You may consider this option to avoid accidental deletion of important documents and files from all devices. You’ll be notified before taking action on your files.
Version History
Google allows users to make changes to their documents without worrying about data loss. It consistently keeps track of all changes that you’ve made and saves multiple versions of the same file without counting your storage quota. You can restore any previous version in the event you accidentally modified your documents in an incorrect manner.
How to Eliminate Duplicate Files on Google Backup & Sync?
Finding duplicate Google Backup & Sync files is pretty easy. With the MD5 match algorithm you can now find duplicate documents, images, videos and compressed files with ease. Most importantly, you don’t even need to download files to your computer before scanning them for duplication. You can scan for duplicates straight from your web browser. This saves a lot of Internet bandwidth and time.
Step # 1: Register On CloudDuplicateFinder.com
- Visit the Cloud Duplicate Finder website and click the Sign Up button to register your account.
- Fill up the details and look for a verification link in your registered email address.
- Click that link to confirm your email and proceed to the next step.
Step # 2: Integrate Your Cloud Account
- Click the Google Drive icon in the tabbed interface.
- Click on the Add New Drive icon.
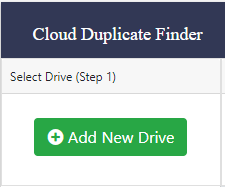
Adding a new drive for duplicate scan
- At this point, you’ll be prompted to enter your Google Drive log-in credentials.
It is completely safe to enter your credentials as the developers of CDF use the Official API of Google Drive and no password or personally identifiable information is sent to CDF developers during this procedure. Your privacy is guaranteed at all times.
- Google Drive will prompt you to confirm file access permissions for CDF. Once you’re done, you’re all set for the duplicate scan.
Step # 3: Scan & Fix Duplicates
- Now that you’ve successfully integrated your Google Drive account, you should be able to see a list of all folder(s) on the left panel. Select the checkboxes for all folder(s) that you want to scan for duplicates.
- Click on the Scan button.
- Wait for the scan to conclude. Once you get the scan results pop up notifying you of the total wasted space as well as the total number of duplicates, click OK.
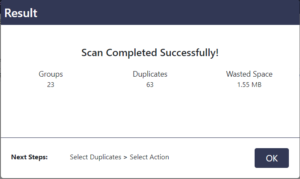
Scan result popup
- Now use the Select Duplicates button to automatically batch select files in a pattern (for example, newest files in each group, oldest files in each group, etc). Alternatively, you can manually select files also.
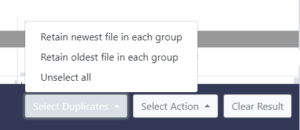
Selecting the duplicates for further action
- Click on Select Action, and then delete your files to the Trash or move them to a completely New folder.

Raza Ali Kazmi works as an editor and technology content writer at Sorcim Technologies (Pvt) Ltd. He loves to pen down articles on a wide array of technology related topics and has also been diligently testing software solutions on Windows & Mac platforms.