
Organize And Dedupe Photos by their Date Properties
Photography is an expensive profession. As a photographer, buying a good-quality DSLR camera will cost you no less than half a thousand dollars. Additionally, as you capture new photos, your hard drive will run out of storage. Surely, buying additional pieces of equipment and accessories such as an external hard disk will expand your storage. But eventually, you’ll encounter the same issue if you don’t address the root problem of duplication. Our daily activities such as photo transfer, file synchronization can result in duplication. If you don’t dedupe your photo library regularly, it starts impacting your efficiency.
Benefits of Organizing & Deduping Your Photos
- Organizing your photos periodically will help you find them when you need them the most
- It becomes easier to locate the right file in no time
- Windows Search results become less cluttered
- Storing your pictures in a structured directory will help you find related photos simultaneously
- With a decluttered library, your file syncing app will take less time and use lower bandwidth to sync your files. Ultimately, the sync task will become smoother.
- It becomes simpler to transfer your photos to an external hard disk or a USB stick.
- Backing-up your images will take less time due to the small size.
Solution: Dedupe & Organize Your Photos
A folder structure is the hierarchy of the directories on your computer. Creating a directory structure based on the timestamp and storing photos in the appropriate sub-folders will make them accessible at all times. It is especially helpful for photographers who can store their photos in the appropriate directory based on the date of the photo taken.
Method 1: Using PowerShell to Organize Photos Only
Fortunately, creating an entire directory structure can be accomplished using the Windows PowerShell itself.
Limitation:
With the following method, you can only build a new folder structure to organize your photos. You cannot identify and fix the root problem of duplication.
Steps:
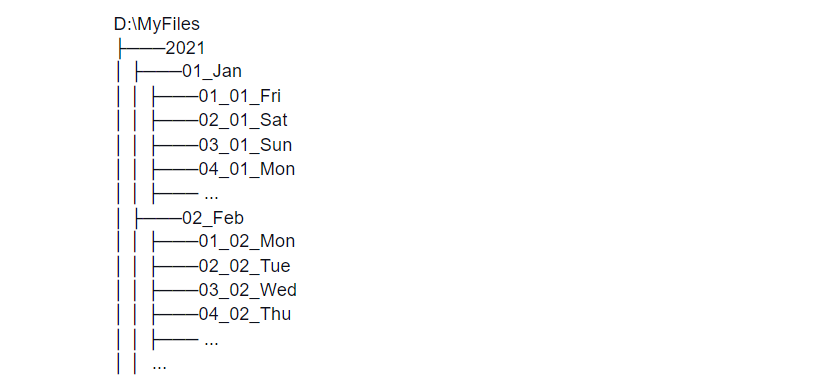
- Type Windows PowerShell in the Search Box on your Taskbar. Or right-click on your Start button and select Windows PowerShell.
- Run the following command after changing the Base folder value to your desired path.
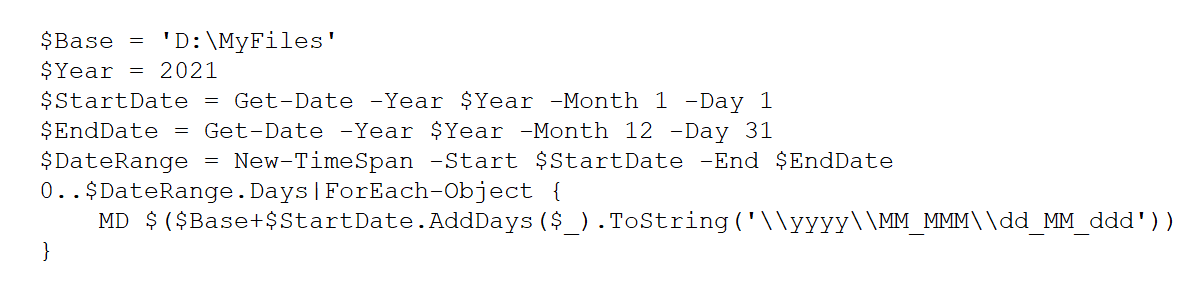
That’s it, PowerShell will automatically create a folder structure as in the following example:
A word of caution…
While PowerShell is a great tool to automate your tasks, incorrect commands could cause severe data loss. It is always recommended to verify your commands twice before execution. If you’re not technically proficient, switch to Method 2 below for a safe alternative.
Method 2: Using PictureEcho to Dedupe & Organize Your Images (Recommended)
Using a specialized tool PictureEcho, not only can you organize your photos but also scan them for duplication. The use of an automated tool guarantees the user can dedupe and organize hundreds of files without worrying about data loss or accidentally harming their system.
Organizing Your Files Using PictureEcho
PictureEcho lets you define how you want to organize your files. For example, you can organize files by their date created, date taken or date modified. You can also modify the date format, change it from the default Year Month Day format to Month Day Year or Day Month Year.
- Download and install PictureEcho.
- Set the Scan Mode to Image Optimizer.
- Click on Add Path, and select the directory that contains your photos. You can add multiple directories to scan.
- Set the Organize By to Date Created, Date Taken or Date Modified.
- Select your preferred date format, preferably Year Month Day.
- Set the Organize by to Year/Month/Date unless you want to organize in other ways.
- If you would like to copy all images to the newly organized folders, select Copy images to organize folders. To move your images instead, select Move images to organize folders.
- Click on Browse and select the destination directory.
- Click on Organize Images to proceed.
Dedupe Your Photos Using PictureEcho:
- In the PictureEcho main interface, set the Scan Mode to System Scan.
- Click on Add Path and add the directories you want to scan for duplicate photos.
- Select your desired similarity criteria (Exact Match or Similar Match).
- You can also adjust the slider to change the Similarity Threshold.
- Click on Start Search.
- Once the scan is finished, your duplicate photos will appear into groups based on their similarity.
- Use the Select Duplicates button and choose to retain the newest files in each group, or choose another selection pattern of your choice.
- Click on Select Action and delete your photos permanently or move them to a separate folder, in case you need them later.
Vikas is a technology enthusiast who loves writing articles on computers and technology. He writes on various topics related to software, software reviews, troubleshooting and tips & tricks to make people’s digital lives better.