
Rename Google Docs Files in Bulk
One of the best ways to better organize your files is to name them properly. This helps divide them into sub-directories and improves the overall workflow and productivity.
Product Spotlight (Cloud Renamer): Use Cloud File Renamer to instantly rename Google Docs and Google Drive files, 100% online.
CFR is a web-app made by our company, Sorcim Technologies. Use it and share your feedback with us!
Imagine having a folder full of random file names such as “xyz” or “ab33” that you typed while you were in a hurry. Now when you move them to a different folder, do you think you will possibly remember which file was which one after a few months? This is exactly why you should rename your files appropriately.
Manually renaming each and every file sounds like a daunting idea, no? Especially when the files are stored on a cloud service like Google Drive! To make this task simpler, we introduce to you a highly secure and easy-to-use web service called Cloud File Renamer.
What is Cloud File Renamer?
Cloud File Renamer is a web service that allows users to rename files from their cloud service accounts including Google Drive. CFR’s smart algorithm renames files at a very fast pace, and with absolute accuracy!
Cloud File Renamer uses 256-bit encryption technology to ensure your data is treated with the most secure and reliable methods that are available. No password or file is stored by the program itself. Since CFR uses the official API of Google Drive, users don’t have to worry about any safety and privacy concerns.
How to Rename Files on Google Drive?
The process is pretty straight-forward and not at all time-consuming. Just read through our guide and follow these simple steps.
Registration & Login
The good thing about Cloud File Renamer is that you don’t need to install anything on your computer. Simply go to its website (cloudfilerenamer.com) and create your Cloud File Renamer account through your existing Google or Microsoft email account. You will be asked to grant CFR the necessary permissions.
You can also register and create an account with some other email domain. In this case, you will receive an account activation link via email. Don’t forget to check the spam section if you have been waiting for a while for the activation link, but it hasn’t landed there.
Linking to Google Drive
Cloud File Renamer is compatible with multiple cloud services such as OneDrive, Google Drive, Dropbox and Amazon S3. Once the web app launches, you can select your desired cloud from the toolbar at the top, which in this case will be Google Drive.
The next step is to click the Add New Drive button, enter your Google account credentials and get your Google Drive data processed through the highly secure Google Drive API.
Select & Load Files
Now you will see your entire Google Drive folder structure loaded into the Cloud File Renamer interface. Simply select the folders which contain the files you want to rename and then hit the Load Files button to load those files into Cloud File Renamer.
Note: Please remember that CFR doesn’t rename the files that are located in the root (or the home section) of any cloud drive. So be sure to move all such files to a folder if you want to rename them.
Apply Renaming Rules
Here comes the main part. Now you have to decide how you want to rename your files. Cloud File Renamer gives you several options such as:
- New Name (give your files a completely new name)
- Replace Text (find and replace instance(s) of specific character(s) from existing filenames)
- Remove Text (delete instance(s) of specific character(s) from existing filenames)
- Trim Text (remove characters by the user-specified length at the beginning or end of the filename)
- Numbering (insert a number at the beginning or end of the filename)
- Insert At (insert specific characters at specific positions in the existing filenames)
- Swap (swap the position of text located before and after a specified portion of the filename)
- Title Case (changes the first letter of each word in the filename to uppercase)
- Prefix (add a prefix to the filename)
- Suffix (add a suffix to the filename)
- Uppercase (convert the entire filename to uppercase)
- Lowercase (convert the entire filename to lowercase)
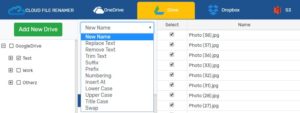
A glimpse of the rename operation at Cloud File Renamer
Once you have selected the concerning rule and the relevant settings, click the Add Rule button to add it for onward rename operation of the selected files. Now here comes another cool part, which is that you can also apply more than one rule at once. Simply select the next rule you want to apply and enter the relevant details just like you did so for the previous rule.
You will also be able to see a preview of the to-be-renamed files on your screen before you launch the renaming job. If you don’t like the results, you can simply remove that rule from the Applied Rules section and even add it with the settings of your choice.
Warning: Please remember that this is the last stage where you can make any changes to the renaming process. This is why make sure you preview all the changes before hitting the Rename button.
The Renaming Part
Once you are satisfied with the previews, you can finally hit the green Rename button. The process is designed to be super-fast, but it also depends on the number of files involved, Internet speed etc. Once it is complete, you will be able to view all the changes on the cloud, and also on your desktop (if you’ve set up Google Backup and Sync on it).
As you can see, Cloud File Renamer offers a very simple way to rename Google Drive files in bulk. The process is not just convenient, but also pretty fast. What else could you wish for? Do give it a try!

Raza Ali Kazmi works as an editor and technology content writer at Sorcim Technologies (Pvt) Ltd. He loves to pen down articles on a wide array of technology related topics and has also been diligently testing software solutions on Windows & Mac platforms.