
Best Practices for Cloud to Cloud Migration
Cloud computing has become a regular fixture of many businesses and individuals in today’s world. Businesses rely on cloud technology for their regular data needs. It provides them easy access to their data and ability to back it up whenever they want. Even in calamities such as earthquakes and floods, you can rest assured that your data is safe.
Moreover, you can share large files with individuals without having to worry about size limits. Traditional way of email attachment does not support uploading large files whereas cloud systems can be used to upload very large files, typically several GBs in size, and share them on the go with simple clicks. Cloud storage offers some added features as well. Major cloud servicing platforms such as Dropbox keep record of your file versions so that you can restore a corrupted file to an older version anytime.
Major cloud services provide a free quota to store your documents, photos and other files. You can utilize the free quota to store your files with ease. If you need additional storage, you must upgrade your plan. But what if you already have ample of free space on another cloud account and wish to migrate your data? What if you wish to keep your stuff organized in a single cloud account so that it becomes easier to access it at one place? Yes, that is quite possible. In this blog post, we’ll discuss a couple of methods to migrate your data from one cloud account to another.
Method 1: Download Data & Reupload to Another Cloud Account
If you haven’t guessed yet, you can download all your data from one cloud account and re-upload it to another. However, this can be a very tricky and time-consuming process. It may even cost a precious amount of bandwidth volume, especially if you’ve subscribed to a metered Internet connection. Besides, access to a high-speed Wi-Fi connection is a must.
- Login to your cloud account.
- Use the following keyboard shortcuts to select multiple folders/ files that you want to transfer:
- Ctrl + Click to select items in an non-orderly manner in a row.
- Shift + Up/ Down Arrow to select items in a row in an orderly manner.
- Right-click your selection and choose Download. The download may take a while, depending on the total number of files being downloaded as well as the Internet speed.
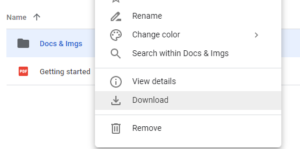
Downloading the selected files/ folders
- Once the download is over, log-in to the cloud account you want to use for storing those files.
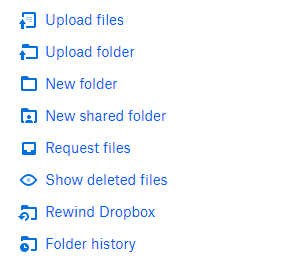
- Right-click an empty area and select Upload. Alternatively, use the Upload icon on the toolbar. (In the case of Dropbox, use the Upload folder or Upload files options on the right-hand side panel).
- Select the downloaded folders or files from the hard disk and then click Upload/ Open.
Method 2: Using Web-based Cloud Migration Services
Another approach is to use a web-based cloud migration service to transfer your data. These services are super-easy and provide you the flexibility to transfer your data at a very fast speed. Besides, they do NOT cost your Internet bandwidth. The entire migration task is done “over the Internet”. No file is downloaded to your PC. Sounds good? Well, keep reading.
Here are some major benefits they do offer over the traditional way of downloading and re-downloading files:
- Add Multiple Accounts: Add your cloud accounts (both the original cloud account that contains your files and the new cloud account where you intend to transfer the files).
- Add a Task: Create a cloud transfer task to perform the process synchronously. You can perform multiple transfer tasks at the same time to get optimum results.
- Simple Copy-Paste: Simply copy and paste the folders as you usually do. The transfer process will instantly start.
- Start the Process & Forget About It: Another neat fact about MultCloud is that you DO NOT have to sit back and wait for the transfer to complete. Just start the transfer process and forget it. The transfer process runs in the background on MultCloud’s servers. You can safely close the browser or even shut down your PC. The transfer process will NOT be interrupted.
- Free Quota: When you register on MultCloud, you get a free bandwidth quota of 30 GB renewed every month. You can register for free and instantly start file transfer without having to pay a single penny.
- Scheduled Transfers: Scheduled transfer performs regular transfer tasks automatically without you having to initiate them every time. This is a premium feature, though.
Here’s how to proceed with the actual steps:
- Visit the MultCloud official website and create an account for free. You’ll receive a verification email in your inbox. Make sure to click it and instantly activate your account.
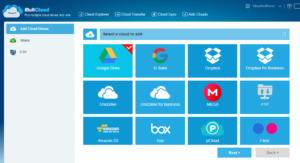
- Log-in to your account and click the Add Cloud Drives icon on the left-hand side panel.
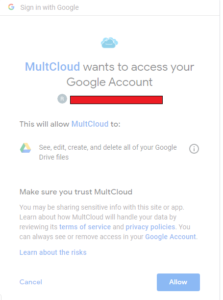
- MultCloud will display all the cloud platforms they support. Select a cloud platform that contains files you want to transfer (for the purpose of this tutorial, Google Drive), and then click Next.
- Type a Display Name for your account (keep it short and simple). Depending on your cloud account, if you’re prompted to type your login credentials at this stage, enter your email id and password.
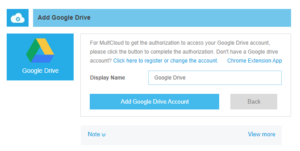
Adding up a Display Name
- Click the Add Account button and your account will be added.
- If you were not prompted to enter log-in credentials in step # 4, you’ll now be asked to allow access permissions. Click Allow.
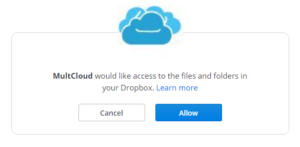
- Now add the destination cloud account for your data (In this example, Dropbox).
- Once you’re done, both of your accounts should be visible in the Cloud Explorer section of MultCloud. If not, click on Cloud Explorer to refresh it again.
- Open up the source drive (Google Drive in this example) and navigate to the parent folder that contains data you want to transfer.
- Use the checkboxes to select multiple sub-folders at once. You can use the same pattern to select multiple files also.
- To move folders from one account to another, right-click your selection and choose Cut. To copy your folders to another cloud account, right-click the selection and choose Copy.

- Go to the destination account (Dropbox in this example). Right-click on an empty area of the screen and select Paste.
- Your folders/ files transfer will start instantly.
Search Your Cloud Account for Duplication
Duplicate files can consume a large portion of your cloud account’s storage. Deleting duplicates offers incredible benefits:
- Save your storage space: Save precious space and make room for files you truly need.
- Economical: Too many duplicates can take a considerable amount of storage and your cloud account may run into low storage issues. Instead of upgrading your account for a sum of money, clean-up duplicates and make room for new files.
- Keep your files organized: Duplicates can even make it difficult to search for the right file. Get rid of disorganization and keep your stuff organized by regularly searching your cloud account with Cloud Duplicate Finder.
Cloud Duplicate Finder- A Web-App for Searching Cloud Duplicates
Cloud Duplicate Finder, a browser-based utility, makes it incredibly easy and fun to eliminate duplicates. CDF scans files on your cloud account for duplicates using special algorithms and modern technology that offers 100% accuracy. CDF does NOT require you to download a single file. Simply register for an account on CDF website and add your cloud accounts. That’s it, your files will be visible straight inside your browser and you can perform the duplicate scan over and over again.
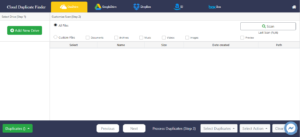
Cloud Duplicate Finder user interface
Prominent Features
- Fully cloud based, no need to download and install any software.
- Uses official APIs from the respective cloud platforms. Absolutely no compromise on user’s privacy.
- Easy to use interface optimized for beginners and not so savvy PC users.
- In-house preview functionality to display the contents of your files without having to download them separately.
- Automatic file selection patterns make it easier to select batch files with a single click.
- Move files to Trash or specify a folder of your choice to move the duplicates (The Move to folder option is not available for Amazon S3 and Box).

Raza Ali Kazmi works as an editor and technology content writer at Sorcim Technologies (Pvt) Ltd. He loves to pen down articles on a wide array of technology related topics and has also been diligently testing software solutions on Windows & Mac platforms.
Raza – I’m hoping you can help clarify something… Migrating data from Google Drive to OneDrive and have used MultCloud…very easy. I have tools to de-duplicate files that are local but not all cloud data is local. Cloudduplicatefinder sounds very promising… Question: Will the service only search for duplicates within a cloud service? OR Will the service perform a deduplication between OneDrive AND Google Drive? I am hoping I can de-duplicate PRIOR to using Multcloud. Thank you for you blog posts.
Cloud Duplicate Finder currently supports scanning only a single cloud account type at the moment. But this feature of cross-platform scan is already in our plans and will be rolled out soon.
Out software app Clone Files Checker (https://www.clonefileschecker.com/) might be able to help you out if you can sync all the data to your computer. Please do not hesitate to contact us for more assistance.
We also offer complimentary Remote Technical Assistance to all our Premium customers, so be assured of a dedicated agent at your disposal to help address any issues you face during a scan.