
Different Types of Date Formats which can be handy in Renaming and Organizing Files
In today’s busy world, keeping your documents organized and easily accessible is quite a chore and challenging task. Many of us don’t store our documents on a single device. We use cloud technology to store our files online. We dump files on external hard drives, USB sticks, memory cards to keep them with us wherever we go. The result of all this can be a digital nightmare with no track of anything.
To make sure that your documents are easily accessible, you need to organize them periodically. The goal of organizing your documents efficiently is to ensure you’ll be able to find a document, even after years of its creation.
Why is Organizing Your Files so Important?
For Businesses
For businesses, data is a crucial asset and a valuable resource. To provide better support to customers and to provide timely resolutions to their problems, it’s important to keep data at their disposal and organize it correctly. Oftentimes, due to compliance regulations and other reasons, businesses have to store a sheer amount of data over years. The size of the data involved can be so huge that businesses have to employ a separate workforce for meaningful data management and organization. Losing that data can be troublesome.
For Individuals
Not just businesses, individuals can also find themselves in difficult situations for not being able to quickly locate their crucial information. Whether you’re a student, professional or home user, managing your files is essential.
Solution 1: Create Nested Directory Structure & Organize Files Based on Date-Time Stamp Using PowerShell
Although Windows PowerShell is an incredibly helpful tool to automate your tasks, it can be disastrous if used incorrectly. Mistyped commands, using incorrect commands without verification, or blindly typing commands without checking their compatibility with your situation, could cause unexpected data losses. If you’re a beginner, we highly recommend that you verify the commands before executing them.
To create a nested directory structure using PowerShell:
- Press Windows Key + X, select Windows PowerShell (Admin).
- Type the following commands. Be sure to modify them depending on where your data is stored and other configurations of your system.
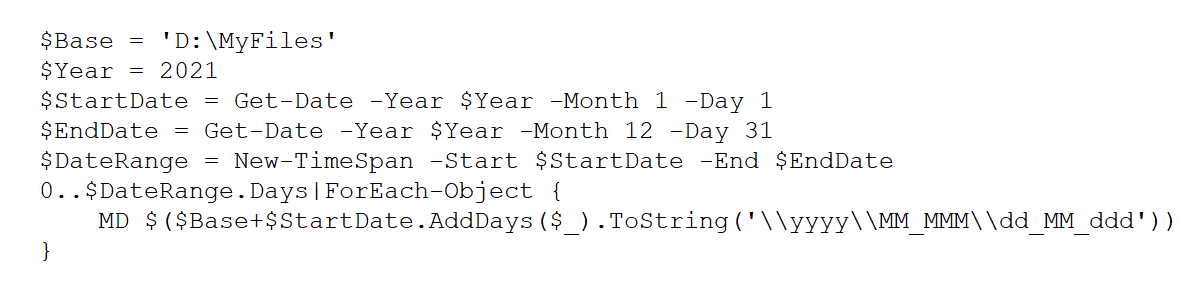
Replace D:\MyFiles with the actual directory on your hard drive and customize the date format depending on your requirement.
Solution 2: Rename & Organize 1000s of Files with One-Click (Easy, Safe & Recommended Approach)
You can rename hundreds of thousands of files on your PC using a handy tool called Easy File Renamer. EFR is an all-in-one tool that lets you securely rename files on your PC. In addition to this, you can rename files on your cloud account (using a free subscription to a companion Web service), batch fix MP3 and iTunes music tags, organize your files using date parameters and different date formats, besides moving or copying large-sized files without errors. Here’s how to perform batch rename using Easy File Renamer:
Step 1: Batch Rename Files Using 10+ Renaming Patterns
- Download Easy File Renamer, a handy tool for both renaming and organizing your files.
- Install the software and then launch it.
- Click on the System Renamer tab.
- Click on Files, and choose Add Files.
- Select the files which have to be named and then click on Open.
- Select your desired renaming pattern from the Select Rule drop-down box and then select the relevant options for that rule.
- Click on Add Rule to confirm.
- You can add multiple rules if you need them.
- Click on Rename to preview the new names for your files.
- To confirm, click on Rename again.
Supported Renaming Patterns:
- New Name: Give a new name altogether for your files with this option.
- Remove Text: You can remove certain characters from your file name using this option.
- Replace Text: Use this option to find specific characters and replace them with others.
- Trim Text: Use this option to trim your file name by the number of characters of your choice. You can trim text at the start of the name or the end.
- Prefix: Adds a custom text of your choice at the beginning of your file name.
- Suffix: Suffix is the complete opposite of prefix. You can add a custom text at the end of the file name (before the file extension).
- Numbering: Numbering will add numbers in ascending order at the end or start of your file names. You can start incremental numbers from 0 (zero) or add a random number of your choice.
- Swap: Swap enables you to change the sequence of the characters by specifying a separator character. For example, if the file name is windows-pc.docx, swapping will rename it to pc-windows.docx.
- Insert At: Use this renaming pattern to insert a new character into your file name at a specific position.
- Lowercase: Use this option to convert your file names to lowercase.
- Uppercase: Use this option to convert your file names to uppercase.
- Title Case: Use this option to capitalize the first character of every word.
Step 2: Organize Files Using Date Formats By Creating a Logical Hierarchy or Nested Directory
- Open up Easy File Renamer and click on the Organizer tab.
- Click on Add Path and then select the folder that contains files you want to organize and then click on OK.
- Use the same procedure if you want to add multiple folders.
- Once you’ve finished adding your folders, the next step is to choose a pattern.
- In the Organize Files drop-down menu, choose which file type you want to organize (for example, all files, images, documents, archive, music and video).
- In the Organize By drop-down menu, choose whether to organize your files by their date of creation, date of modification or the date taken (in the case of photos).
- In the Date Format drop-down menu, specify your desired date format. Year-Month-Day is the default format which you can change, if you like.
- In the Organize As drop-down menu, choose a folder creation pattern (for example, year month day, year month, or just year).
- To copy your files to the newly organized directory, select Copy files to organize folders, or choose Move files to organize files in the case you want to move them.
- Type a destination folder and then hit Organize to proceed.
Vikas is a technology enthusiast who loves writing articles on computers and technology. He writes on various topics related to software, software reviews, troubleshooting and tips & tricks to make people’s digital lives better.